Davnelle Electronics 
Davnelle Electronics |
Motorcycle Helmet Headset description and specifications.
The headsets recommended by Davnelle Electronics should be equal to or better than the following specifications. (Note that specifications may change at our discretion)
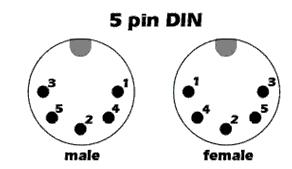
Each headset speaker is intended to be installed inside a full face motorcycle helmet according to the notes below. General Notes: The main cable extending from the head unit to each helmet while being quite robust, is designed to withstand the stress presented at the helmet exit point when the helmet is placed right side up on a flat surface. Despite this quality, one should not tempt fate by exposing the cable to unnecessary flexing. Our prototype has been subjected to normal daily use for the past 4.5 years without any sign of damage to any component in the system. Principles of Installation and operation. 1. INTRODUCTION. A pair of headsets will be required if rider-passenger communication using the Easycom basic model on one vehicle is required. Each speaker option available from Davnelle employs drivers that form a very small package. This ensures a minimum of discomfort when used inside a helmet environment. The speaker units can be fixed to the moulded ear cavity within the helmet using the hook tab supplied. The position for each speaker is critical to the efficient operation of the system and choosing the wrong place will cause the volume and or frequency response too be compromised. The wrong position may also create a pressure point at your ear which after a while WILL become unbearable. If the ear cavity is too small then your only option is to excavate an opening into the helmet's polystyrene shell and either refashion the inner lining to the new shape or permanently install each speaker as a cut & shut operation. 2. HELMET MODIFICATION. 2a. DISCLAIMER. If you desire permanent installation of headset into helmet (and from a comfort point of view this is our preferred option) then you are most welcome to modify your own helmet. The notes supplied below are general in nature and apply with a Shoei RF800 in mind. Your helmet may require a different approach and therefore any advice offered here will serve only as a guide. Click here for a picture of that Shoei installation which was performed on the unit shown and another identical helmet in 1999. Neither helmet (nor any other that we have modified) has required any form of maintenance apart from cleaning now and then since the date of installation. Will a modified helmet become dangerous? It depends on how much polystyrene material is removed from the helmet in order to create room for the headset components. For that reason we can only stress that you remove as little material as possible. The internal lining fabric and the underlying foam rubber is for your comfort and has no bearing at all on the helmets protective characteristics. All helmet standard tests including AS 1698 and the highly respected Snell M2000 only apply impact tests above the eye line. The lower half of the helmet is not impact tested and as we understand, no tests are applied to the chin guard area of a full face helmet nor is the internal rubber/fabric lining tested. This information is applicable as of 2003 and may be subject to change in future. In summary, making minor changes below the eye line may not affect the safety of the helmet and provided you exercise some care when performing the operation your helmet should continue to offer the same level of protection it did prior to any modification. 2b. SPEAKER INSTALLATION. The position of the speaker must be accurately determined and marked before any cutting occurs and for safety's sake you really only get one chance to do it right. A single slit 40mm in length can be cut into the lining fabric and then that fabric folded open to expose an area equal to the speaker. The polystyrene liner can be removed in SMALL pieces until a hole suitable for the speaker exists. DO NOT simply cut a hole straight through to the helmet shell since this will remove any remaining sound insulation that the polystyrene may offer. Putting this another way, we went to some trouble to filter out the wind noise picked up by the microphone and it would be a shame to have that noise re-introduce itself via acoustic coupling caused by little or no insulation in the resulting speaker cavity. Again we emphasize that it is EXTREMELY important that you cut and remove ONLY what is necessary. It may be necessary to cut the wires leading to the speaker and route them between the polystyrene liner and the outer shell. The speaker can be glued into place with a small dab of hot melt glue. Any other form of glue may result in melting the foam or the fabric liner. The liner can then be sewn back together by stitching along the cut. The foam surround that is supplied with each headset speaker can be removed if space is limited in a permanent installation. Take another look at the Shoei example above which clearly shows that except for the exiting cable the system can be made invisible and therefore not subject to daily wear and tear. 2c. MICROPHONE INSTALLATION A small opening should exist in the fabric liner around either chin strap which will allow the microphone to be pushed through and up to the beginning of the chin guard. The microphone wires may need to be cut so that they can be routed back to the main cable exit point. We prefer to install the mic on the left side of the helmet away from passing road noise (it does make a small difference). If the mic is to be a temporary installation the simply route the wire over the liner and along the space between liner and shell towards the main cable exit point. 2d. CABLE EXIT The cable exit point should be at the rear of the helmet towards one side depending on whether you are left or right handed. The cable should be pushed up between the liner and the outer shell and held in place with some hot melt glue if a permanent installation is required. It should be possible to open up the liner/shell gap with a screwdriver or similar to allow glue gun access or cable placement. Note that most helmet components will melt if heat or solvents come into contact and NEVER drill a hole into the outer shell. The length of cable exiting the helmet should be sufficient (approx 200mm) to allow sighting of the connector while wearing the helmet which then allows for easy connect/disconnect from the curly cable. If any wires were cut during the install process then they should be re-terminated, soldered and insulated (preferably with heat-shrink tubing) before the main cable is pushed home. 3. USING YOUR OWN HEADSET. If you prefer to use your own headset the choice is yours but please note that the curly cord supplied with the Easycom head unit is fitted with a molded 5 pin 180 degree "DIN" audio line socket at both ends of the cable. Click here for a view of this connector. If necessary you can cut and re-terminate the cable to suit your helmet connector (if practical) however be advised that no warranty is offered on a cable that you modify. Note that the Easycom head unit is fitted with a corresponding socket (female) version of this DIN connector therefore one end of your cable set MUST be fitted with our connector. Note that older style computer keyboards were shipped with same connector. There is also a "mini DIN" version of our connector which is NOT the same thing. We tested the standard and mini DIN version with our Easycom prototype and over time found the larger DIN version to be more reliable, has stronger pins and is easier to connect to the helmet due to its size - especially while wearing gloves. There is also a built in safety factor with the DIN connector due to its non locking mating connection which ensures minimal damage when helmet and cable part unexpectedly e.g. when dismounting and walking away from the bike. If you elect to modify the supplied cable to suit your connector then we recommend that you confirm that your connector type is available. The pin connections for our 5pin DIN audio cable/connector follow a conventional numbering scheme listed below,
4. SUMMARY. Modifying a helmet is a personal decision only you can make. If you decide to do so and the operation is conducted in a professional manner then you will have the most comfortable and robust solution for every day use.
|
Web Master. |
